
Our Biggest Vampr Pro Challenge Yet!
Got a musical idea and need the right people to bring it to life? Whether you’re a bedroom producer, topliner, songwriter, or someone with a voice memo full of sparks, Collabs is here to help you make it real.
And to celebrate the launch, we’re giving away some seriously cool prizes just for sharing your idea.
🎧 What’s Collabs?
Collabs is a brand-new feature in the Vampr app that makes starting a music project way easier.
Instead of endlessly swiping or messaging to find collaborators, just post your idea — a demo, a beat, some lyrics, whatever stage you’re at — and let the right people come to you.
You can outline what you’re working on, what kind of collaborators you’re looking for, and even include a rough audio demo. Whether you’re looking for a co-writer, vocalist, mix engineer, or someone to jam with — Collabs helps you find them fast.
🏆 How to Enter the Competition
To celebrate the launch of Collabs, we’re running a 3-week competition — and you’re invited.
Here’s how to enter:
- Download the Vampr app (if you haven’t already)
- Start a free 7-day trial of Vampr Pro
- Post your first Collab with an audio demo
- That’s it — you’re in the running to win
✅ Already a Pro user? You’re automatically eligible — just post a Collab.
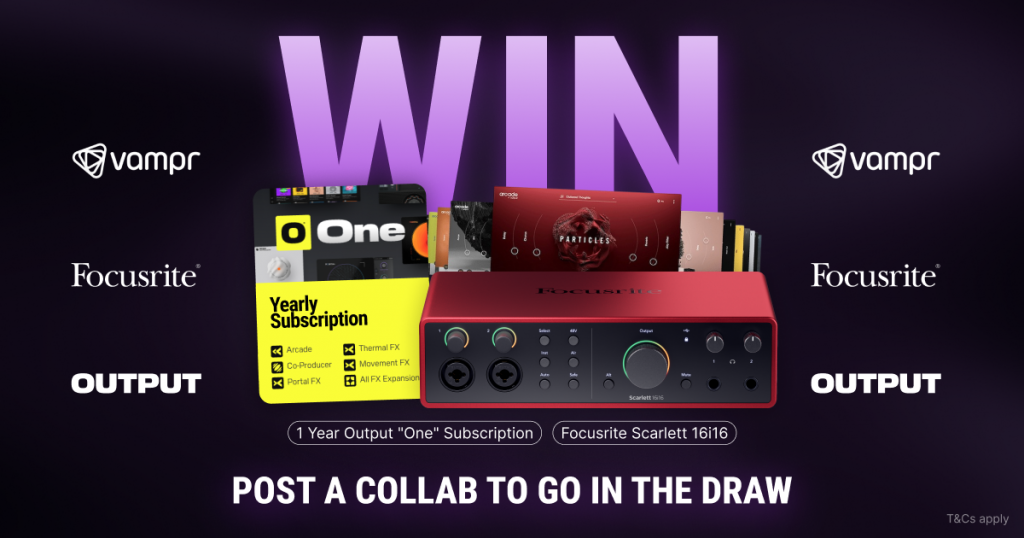
🎁 What You Can Win
One lucky creator will win:
- A Focusrite 16i16 4th Gen Interface – perfect for upgrading your home studio
- A 1-Year Subscription to Output Arcade – unlock endless sounds and samples
✨ Why You Should Try It
No matter where you’re at in your musical journey, Collabs is built to help you move forward.
- Get your idea in front of a global network of collaborators
- Attract the right people who can help you build it
- Try out Vampr Pro with a free trial and see what the buzz is about
- And yep… you might just win some incredible gear
You don’t need a finished song — we’re looking for creativity, clarity, and collaboration potential. Even a rough voice memo can spark something great.
⏰ Deadline
The competition is open until 17th of July — so don’t wait too long. Post early, start connecting, and give yourself the best shot.
🚀 Ready to Go?
Download Vampr, start your free trial, and post your first Collab today.
Whether it’s a beat, a chorus, a concept — the next chapter of your sound could start right here.
🎤 Let’s Collab. Let’s win. Let’s make something amazing.
Vampr Collabs Competition – Terms & Conditions
Effective Date: 25th June 2025
End Date: 17th July 2025
Promoter: Vampr Inc. (referred to as “Vampr”, “we”, “our”, or “us”)
1. Eligibility
- This competition is open to current Vampr Pro subscribers only.
- Entrants must be 18 years of age or older at the time of entry.
- Employees, contractors, affiliates, and immediate family members of Vampr are not eligible to enter.
- The competition is void where prohibited by law.
2. How to Enter
- To enter, participants must post a new Collab within the Vampr app during the competition period.
- Each participant is limited to one (1) entry.
- The Collab must include an audio component (demo, idea, or work-in-progress).
- Entries must be submitted before 11:59 PM PDT on 17th July 2025.
3. Entry Guidelines
- The submitted Collab must be original and created by the entrant.
- No purchase is necessary to enter beyond an active Vampr Pro subscription.
- Inappropriate, offensive, or infringing content will be disqualified and may result in account suspension.
4. Winner Selection
- One (1) winner will be selected by the Vampr team at the end of the competition period.
- Judging criteria will include:
- Creativity of the Collab concept
- Clarity in how the vision is communicated
- Potential for collaboration as demonstrated in the post and audio
- The decision of Vampr is final and no correspondence will be entered into.
5. Prizes
- The winner will receive:
- 1x Focusrite Audio Interface
- 1x One-Year Subscription to Output Arcade (or a comparable Output product if unavailable)
- Total prize value may vary depending on product availability and shipping region.
6. Prize Conditions
- Prizes are non-transferable, non-exchangeable, and not redeemable for cash or credit.
- Vampr reserves the right to substitute the prize with a product of equal or greater value if necessary.
- The winner will be notified via the Vampr app and/or email within 7 business days of the competition end date.
- The winner must respond within 5 business days to claim their prize, otherwise a new winner may be selected.
7. Rights & Publicity
- By entering, you grant Vampr the right to feature your Collab post (including audio and description) for promotional purposes on our website, app, and social channels, with credit to your Vampr profile.
- You retain ownership of your work.
8. General Conditions
- Vampr reserves the right to amend or cancel the competition and these Terms & Conditions at any time without prior notice.
- By participating, you agree to be bound by these Terms & Conditions and Vampr’s Terms of Use and Privacy Policy.
- Vampr is not responsible for technical issues, network failures, or delays that may prevent entry.
9. Governing Law
This competition is governed by the laws of the State of California, United States, and any disputes shall be subject to the exclusive jurisdiction of the courts located in Los Angeles County, California.
10. Contact
For any questions related to the competition, please contact:
📧 [email protected]
About Vampr
Vampr is the ultimate music networking app designed to help you connect with musicians and grow your career. As a leading music industry network, Vampr makes it easy to find music collaborators, join a band, or even find a jam partner. Whether you’re searching for band members or looking to expand your music community platform, this app for musicians streamlines music collaboration like never before. Ready to take your music to the next level? Start networking and create something amazing today!
Vampr is the place to discover and collaborate with talented artists across all genres!
See why Vampr is the #1 app for music industry collaboration and networking
Every great track starts with a great beat. Whether you’re a rapper, singer, or songwriter, knowing how to find a beatmaker who gets your vibe is crucial to creating music that stands out. The right beat can inspire your lyrics, shape your sound, and take your creativity to new heights.
But if you’ve ever tried to find a beatmaker the old-fashioned way – digging through sketchy websites or DMing random producers – you know it’s not always easy. That’s why we’re here to break it down.
Why Finding the Right Beatmaker Matters
Working with a beatmaker isn’t just about getting a backing track. It’s about collaboration, chemistry, and unlocking the full potential of your ideas. When you find a beatmaker who understands your sound, you get:
-
Original, tailored beats that fit your voice and style
-
Creative input to help shape the vibe of your track
-
A long-term collaborator who can grow with your project
-
More efficient production that saves time and money
Whether you’re looking for trap, boom bap, drill, pop, R&B, or experimental beats, it all starts with the right connection.
Where to Find a Beatmaker You Can Actually Trust
You could scroll for hours through online marketplaces and hope for the best – or you could use Vampr, the top music networking app made for serious creators.
Vampr makes it easy to find a beatmaker who matches your sound, budget, and creative direction. With detailed profiles, direct messaging, and genre-based filters, you’ll spend less time searching and more time making music.
Whether you’re after lo-fi vibes, club-ready bangers, or cinematic scores, you can discover beatmakers from around the world and start collaborating instantly – all in one app.
Find a Beatmaker Who Fits Your Vision
Here’s the key: don’t just settle for any producer. To really thrive, you want to find a beatmaker who clicks with you creatively. Look for someone who:
-
Shares your musical influences
-
Has a clear, high-quality portfolio
-
Is open to collaboration and feedback
-
Understands your goals as an artist
And with Vampr, finding that person is easier than ever. You can listen to their work, see who else they’ve collaborated with, and start a conversation – no awkward cold calls required.
Your Next Track Starts with the Right Beat
It doesn’t matter if you’re just starting out or already building a fanbase – every artist deserves a beat that hits. So stop waiting, and find a beatmaker who can turn your ideas into tracks that resonate.
Ready to connect? Open up Vampr, start browsing, and make something unforgettable.
About Vampr
Vampr is the ultimate music networking app designed to help you connect with musicians and grow your career. As a leading music industry network, Vampr makes it easy to find music collaborators, join a band, or even find a jam partner. Whether you’re searching for band members or looking to expand your music community platform, this app for musicians streamlines music collaboration like never before. Ready to take your music to the next level? Start networking and create something amazing today!
Vampr makes online music collaboration effortless, helping you find a beatmaker, hire a music arranger, or work with a sound engineer all in one place. Whether you’re looking to find a composer, collaborate with EDM producers, or find a hip hop producer, this platform connects you with the right talent for remote music production. Need professional mixing? Vampr also helps you find a mixing and mastering service and find musicians for recording – so you can bring your music to life with ease.
Vampr is the go-to platform to get work as a musician and find paid music gigs – whether you’re looking for music jobs near me or remote music jobs you can do from anywhere. From landing paid gigs as a musician to securing opportunities to work as a session musician, Vampr connects you with the right people. Need industry support? You can also find a music manager or hire a music manager to help grow your career. Plus, if you’re looking to find a band to join, Vampr makes it easy to connect and start making music today!
Vampr is the ultimate indie musician networking platform, making it easy to find rock musicians, connect with EDM producers, or collaborate on pop music. Whether you’re looking to find hip-hop artists, connect with country songwriters, or find jazz musicians, Vampr helps you build the right creative team. Need to hire classical musicians, find metal band members, or work with electronic music producers?
Vampr is the place to discover and collaborate with talented artists across all genres!
See why Vampr is the #1 app for music industry collaboration and networking
Whether you’re a vocalist, guitarist, or producer, knowing how to connect with country songwriters can be a game-changer for your music career. Country songwriting is built on powerful storytelling, emotional depth, and unforgettable hooks – so teaming up with the right songwriter can elevate your tracks from decent to downright unforgettable.
If you’re serious about crafting authentic country music that resonates, finding the right collaborators is essential.
Why You Should Connect with Country Songwriters
From Nashville legends to rising indie artists, country songwriters know how to turn a simple idea into something that hits listeners straight in the heart. When you connect with country songwriters, you gain access to:
-
Stronger lyrical content – Country is all about the story, and the pros know how to write it.
-
Genre expertise – From classic country to country-pop or Americana, experienced songwriters understand the nuances.
-
A fresh perspective – Collaborating with a songwriter can help you break out of creative ruts and explore new angles.
-
More opportunities – Writing with others often leads to new gigs, performances, and industry connections.
Whether you’re working on your first EP or your next radio single, the right collaborator can help shape your sound – and open new doors.
How to Find and Connect with Country Songwriters
Gone are the days of relying solely on word-of-mouth or chance meetings at a songwriter’s round. These days, you can connect with country songwriters from anywhere in the world – and Vampr makes it easier than ever.
Vampr is a music networking app that helps musicians and songwriters find each other based on location, genre, and goals. If you’re looking for someone to co-write with, pitch ideas to, or start a new project with, it’s the ideal place to connect with country songwriters who match your creative vibe.
Thousands of country artists and writers are already using the platform to collaborate, co-write, and create. Just set up a profile, start swiping, and send a message when you find someone that sparks your interest.
Write Better Songs Together
Country music thrives on collaboration. From writing rooms in Nashville to virtual songwriting sessions, the best work often happens when creative minds come together. So if you want to sharpen your lyrics, add a little twang to your tracks, or break into the country scene, now’s the time to connect with country songwriters who can help make it happen.
And remember – wherever you live, whoever you are, you can do it all on Vampr.
About Vampr
Vampr is the ultimate music networking app designed to help you connect with musicians and grow your career. As a leading music industry network, Vampr makes it easy to find music collaborators, join a band, or even find a jam partner. Whether you’re searching for band members or looking to expand your music community platform, this app for musicians streamlines music collaboration like never before. Ready to take your music to the next level? Start networking and create something amazing today!
Vampr makes online music collaboration effortless, helping you find a beatmaker, hire a music arranger, or work with a sound engineer all in one place. Whether you’re looking to find a composer, collaborate with EDM producers, or find a hip hop producer, this platform connects you with the right talent for remote music production. Need professional mixing? Vampr also helps you find a mixing and mastering service and find musicians for recording – so you can bring your music to life with ease.
Vampr is the go-to platform to get work as a musician and find paid music gigs – whether you’re looking for music jobs near me or remote music jobs you can do from anywhere. From landing paid gigs as a musician to securing opportunities to work as a session musician, Vampr connects you with the right people. Need industry support? You can also find a music manager or hire a music manager to help grow your career. Plus, if you’re looking to find a band to join, Vampr makes it easy to connect and start making music today!
Vampr is the ultimate indie musician networking platform, making it easy to find rock musicians, connect with EDM producers, or collaborate on pop music. Whether you’re looking to find hip-hop artists, connect with country songwriters, or find jazz musicians, Vampr helps you build the right creative team. Need to hire classical musicians, find metal band members, or work with electronic music producers?
Vampr is the place to discover and collaborate with talented artists across all genres!
See why Vampr is the #1 app for music industry collaboration and networking
Electronic music is everywhere – from underground clubs to main stage festivals, from bedroom studios to TikTok virality. But behind every infectious drop and hypnotic bassline is a collaboration that made it all happen. If you’re a vocalist, songwriter, or beatmaker, learning how to collaborate with EDM producers could be your gateway to something big.
Whether you’re looking to top charts or simply create something fresh and experimental, working with the right producer can take your music to the next level.
Why Collaborate with EDM Producers?
The world of EDM is built on partnerships. Some of the biggest tracks in electronic music history came from unexpected creative combos – think vocalists teaming up with DJs, or rappers jumping on house beats.
Here’s why artists seek to collaborate with EDM producers:
-
Access to high-quality production – EDM producers often have top-tier gear, software, and sound design skills.
-
New audience reach – Producers bring their own fanbase and streaming power to the table.
-
Creative inspiration – Two minds are better than one, especially when you’re pushing boundaries.
-
Genre fusion – EDM blends beautifully with pop, hip hop, R&B, and more. A good collab can lead to a truly original sound.
How to Find the Right Collaborators
You don’t need a label or an A&R to land your next collaboration – you just need to be intentional and proactive.
Start by asking yourself:
-
What’s your vibe? Deep house, trance, dubstep, tech-house?
-
What are you bringing to the table – lyrics, melodies, vocals, instrumentals?
-
Are you looking to do a one-off track or start a long-term creative partnership?
Once you’ve got clarity, you’re ready to collaborate with EDM producers who align with your vision.
Use Vampr to Collaborate with EDM Producers
Forget cold DMs or outdated forums. If you want to collaborate with EDM producers who match your sound and goals, Vampr makes it ridiculously easy. It’s a global music networking app where you can swipe, connect, and start collaborating with artists from around the world.
Whether you’re looking to drop vocals on a future bass track or co-produce the next dancefloor anthem, Vampr helps you find the right match without the friction.
Thousands of producers are already on the platform – ready to vibe, build, and release tracks with vocalists, songwriters, and other beatmakers. All you have to do is show up and make your profile stand out.
Collaborate with EDM Producers from Anywhere
The beauty of today’s music landscape? You don’t need to live in LA or Berlin to make waves. With remote recording tools and platforms like Vampr, you can collaborate with EDM producers from across the globe, all without leaving your bedroom studio.
Whether you’re chasing that Spotify playlist placement or just want to experiment with your sound, don’t wait for the perfect opportunity – create it. Start collaborating, start experimenting, and start releasing.
About Vampr
Vampr is the ultimate music networking app designed to help you connect with musicians and grow your career. As a leading music industry network, Vampr makes it easy to find music collaborators, join a band, or even find a jam partner. Whether you’re searching for band members or looking to expand your music community platform, this app for musicians streamlines music collaboration like never before. Ready to take your music to the next level? Start networking and create something amazing today!
Vampr makes online music collaboration effortless, helping you find a beatmaker, hire a music arranger, or work with a sound engineer all in one place. Whether you’re looking to find a composer, collaborate with EDM producers, or find a hip hop producer, this platform connects you with the right talent for remote music production. Need professional mixing? Vampr also helps you find a mixing and mastering service and find musicians for recording – so you can bring your music to life with ease.
Vampr is the go-to platform to get work as a musician and find paid music gigs – whether you’re looking for music jobs near me or remote music jobs you can do from anywhere. From landing paid gigs as a musician to securing opportunities to work as a session musician, Vampr connects you with the right people. Need industry support? You can also find a music manager or hire a music manager to help grow your career. Plus, if you’re looking to find a band to join, Vampr makes it easy to connect and start making music today!
Vampr is the ultimate indie musician networking platform, making it easy to find rock musicians, connect with EDM producers, or collaborate on pop music. Whether you’re looking to find hip-hop artists, connect with country songwriters, or find jazz musicians, Vampr helps you build the right creative team. Need to hire classical musicians, find metal band members, or work with electronic music producers?
Vampr is the place to discover and collaborate with talented artists across all genres!
See why Vampr is the #1 app for music industry collaboration and networking
The music industry has evolved – and so have the ways we work in it. Gone are the days when building a music career meant constant travel, live gigs every night, or living in a big city just to get noticed. Today, work from home music jobs are not just possible – they’re thriving.
Whether you’re a producer, vocalist, songwriter, or mixing engineer, there are more ways than ever to earn from your talent without leaving your home studio (or bedroom setup). The freedom to create on your own schedule, collaborate remotely, and earn real income is changing the game for musicians everywhere.
What Are Work From Home Music Jobs?
Work from home music jobs cover a wide range of roles, including:
-
Remote session work (vocals, guitar, keys, drums, etc.)
-
Songwriting and topline writing for artists or sync
-
Mixing and mastering services
-
Beat production and licensing
-
Music transcription or arranging
-
Voiceovers and jingles
-
Online music teaching or mentoring
Basically, if it involves audio and a skillset you can offer online, it’s a potential gig.
Why Work From Home Music Jobs Are a Game-Changer
Aside from skipping traffic and ditching venue load-ins, work from home music jobs offer:
-
Global opportunities – Collaborate with artists from any country, anytime.
-
Better work-life balance – Create your own schedule and build the life you want.
-
More revenue streams – Take on multiple projects instead of relying on one band or gig.
-
Creative control – Choose who you work with, what you work on, and how you deliver it.
How to Find Work From Home Music Jobs
Here’s where it gets good – you don’t need an agent or a lucky break. You just need the right platform. That’s where Vampr comes in.
Vampr is designed to help musicians connect, collaborate, and get hired. Whether you’re offering your skills or looking to build a creative team, it’s the perfect place to find work from home music jobs that fit your goals and expertise.
From beatmakers looking for topliners to indie artists needing mixing and mastering help, Vampr brings the music industry to your fingertips – no commute required.
Build a Sustainable Music Career—From Your Couch
Don’t wait for opportunities to come knocking. The music world is remote now, and you have the tools to tap into it. Whether you’re just starting out or you’re a seasoned pro, there are work from home music jobs out there waiting for your skills.
Ready to start? Sign up to Vampr, create your profile, and let the jobs come to you. From side hustle to full-time grind, your next music gig could be just one click away.
About Vampr
Vampr is the ultimate music networking app designed to help you connect with musicians and grow your career. As a leading music industry network, Vampr makes it easy to find music collaborators, join a band, or even find a jam partner. Whether you’re searching for band members or looking to expand your music community platform, this app for musicians streamlines music collaboration like never before. Ready to take your music to the next level? Start networking and create something amazing today!
Vampr makes online music collaboration effortless, helping you find a beatmaker, hire a music arranger, or work with a sound engineer all in one place. Whether you’re looking to find a composer, collaborate with EDM producers, or find a hip hop producer, this platform connects you with the right talent for remote music production. Need professional mixing? Vampr also helps you find a mixing and mastering service and find musicians for recording – so you can bring your music to life with ease.
Vampr is the go-to platform to get work as a musician and find paid music gigs – whether you’re looking for music jobs near me or remote music jobs you can do from anywhere. From landing paid gigs as a musician to securing opportunities to work as a session musician, Vampr connects you with the right people. Need industry support? You can also find a music manager or hire a music manager to help grow your career. Plus, if you’re looking to find a band to join, Vampr makes it easy to connect and start making music today!
Vampr is the ultimate indie musician networking platform, making it easy to find rock musicians, connect with EDM producers, or collaborate on pop music. Whether you’re looking to find hip-hop artists, connect with country songwriters, or find jazz musicians, Vampr helps you build the right creative team. Need to hire classical musicians, find metal band members, or work with electronic music producers?
Vampr is the place to discover and collaborate with talented artists across all genres!
See why Vampr is the #1 app for music industry collaboration and networking
No matter how talented you are, sometimes your song needs that extra something – a killer guitar solo, a tight rhythm section, or just a fresh set of ears. That’s where session musicians come in. Whether you’re laying down a demo or finalizing a full album, knowing how and where to hire a session musician can be the difference between an okay track and a standout release.
Why Hire a Session Musician?
Because they’re pros. Session musicians are skilled players who can step into a project, deliver exactly what you need, and elevate your sound – without needing weeks of rehearsal or endless back-and-forth. When you hire a session musician, you’re paying for talent, experience, and efficiency.
Need a jazz drummer for one track and a classical cellist for another? Session musicians make it possible to diversify your sound without building a full-time band. They’re the secret weapon of countless chart-toppers and indie icons alike.
When Are You Ready to Hire Someone?
Here are a few signs it’s time to bring in a hired gun:
-
You’re stuck on a song and need a fresh creative spark
-
Your production needs an instrument you don’t play
-
You want a professional-quality recording without compromise
-
You’re working on a tight deadline and need someone reliable
Instead of settling or stretching yourself thin, hire a session musician and get the job done right.
Where to Hire a Session Musician (Without the Hassle)
You could spend hours combing through social media, email threads, or outdated classifieds… or you could just use Vampr. Vampr is built for musicians who want to collaborate without the friction. You can browse talent, chat directly, and hire a session musician – all in one place.
Looking for someone with a specific genre background or recording setup? Vampr lets you filter and find exactly what you need. From remote tracking to in-studio pros, it’s the fastest way to hire a session musician who gets your sound.
Hire a Session Musician to Stay in Creative Flow
Your time is valuable. When you bring in a session player, you’re not just filling a gap – you’re protecting your momentum. Instead of spending days figuring out how to play slide guitar (or begging a friend to learn it), you can keep creating, keep producing, and keep growing.
If you’re ready to move faster, sound better, and get more done, it’s time to hire a session musician who can bring your vision to life. And yes – you can do it all with Vampr.
About Vampr
Vampr is the ultimate music networking app designed to help you connect with musicians and grow your career. As a leading music industry network, Vampr makes it easy to find music collaborators, join a band, or even find a jam partner. Whether you’re searching for band members or looking to expand your music community platform, this app for musicians streamlines music collaboration like never before. Ready to take your music to the next level? Start networking and create something amazing today!
Vampr makes online music collaboration effortless, helping you find a beatmaker, hire a music arranger, or work with a sound engineer all in one place. Whether you’re looking to find a composer, collaborate with EDM producers, or find a hip hop producer, this platform connects you with the right talent for remote music production. Need professional mixing? Vampr also helps you find a mixing and mastering service and find musicians for recording – so you can bring your music to life with ease.
Vampr is the go-to platform to get work as a musician and find paid music gigs – whether you’re looking for music jobs near me or remote music jobs you can do from anywhere. From landing paid gigs as a musician to securing opportunities to work as a session musician, Vampr connects you with the right people. Need industry support? You can also find a music manager or hire a music manager to help grow your career. Plus, if you’re looking to find a band to join, Vampr makes it easy to connect and start making music today!
Vampr is the ultimate indie musician networking platform, making it easy to find rock musicians, connect with EDM producers, or collaborate on pop music. Whether you’re looking to find hip-hop artists, connect with country songwriters, or find jazz musicians, Vampr helps you build the right creative team. Need to hire classical musicians, find metal band members, or work with electronic music producers?
Vampr is the place to discover and collaborate with talented artists across all genres!
See why Vampr is the #1 app for music industry collaboration and networking